Keep track of time in your next project!
Designed by:
Colin "MrSwirlyEyes" Keef
The DS3231 is a low-cost, extremely accurate I2C real-time clock (RTC). The device incorporates a battery input, and maintains accurate timekeeping when main power to the device is interrupted.
The RTC maintains seconds, minutes, hours, day, date, month, and year information. The date at the end of the month is automatically adjusted for months with fewer than 31 days, including corrections for leap year. The clock operates in either the 24-hour or 12-hour format with an AM/PM indicator. Two programmable time-of-day alarms and a programmable square-wave output are provided. Address and data are transferred serially through an I2C bidirectional bus.
A precision temperature-compensated voltage reference and comparator circuit monitors the status of VCC to detect power failures, to provide a reset output, and to automatically switch to the backup supply when necessary.
In this tutorial, we will explore the DS3231 and program the RTC so you can utilize time in your next project!
| DEVICE | VENDOR URL | QUANTITY | NOTES |
|---|---|---|---|
| Arduino UNO R3 | Digikey | 2 | May use other variants, but may need minor changes to code. |
| USB Cable (A Male to B Male) | Digikey | 2 | |
| DS3231 Real Time Clock Breakout Module | Amazon | 1 | |
| Breadboard (small) | Digikey | 2 | Used for prototyping. |
| Jumper Wire M/M 6 (20pcs) | Digikey | 2 | Used for prototyping. |
To become familiar with the capabilities and limitations of the DS3231 real-time clock module. Understand how we will communicate between the microcontroller (e.g. Arduino UNO) and the DS3231 via I2C (inter-integrated circuit).
The DS3231 real-time clock (RTC) integrated circuit (IC) is manufactured by Maxim Integrated. Using the RTC is easy for both reading the date and time, and writing the date and time. For convenience, we will use a DS3231 breakout module.
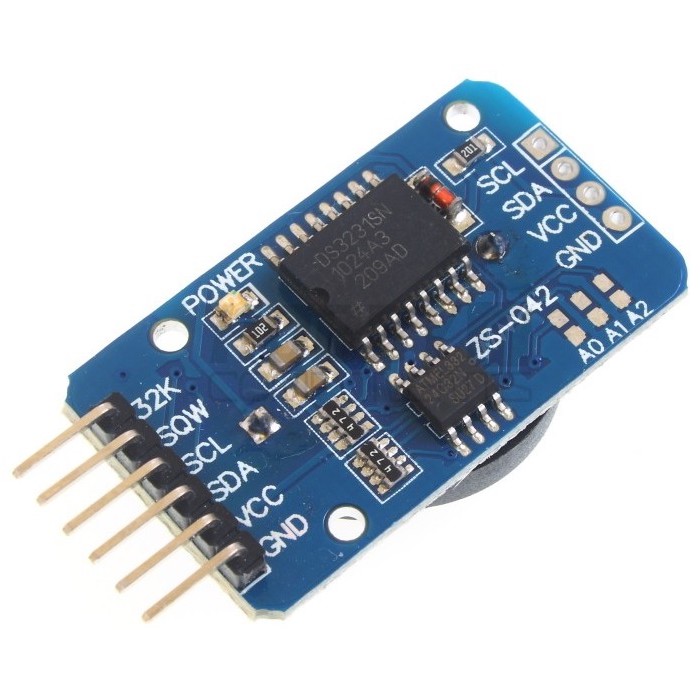
The pinout of the DS3231 module we will be using is as follows:
| DS3231 pin | Description |
|---|---|
| VCC | 2.3-5.5V |
| GND | Common GND |
| SDA | Serial data |
| SCL | Serial clock |
| 32K | 32kHz output |
| SQW | Square-Wave Output |
We power the DS3231 breakout module through VCC and GND. Communicating with the RTC will be done with the I2C interface pins: SDA and SCL. We will not concern ourselves with pin 32K and pin SQW.
The Inter-Integrated Circuit (I2C) Protocol is a serial protocol for a two-wire interface allowing multiple "slave" devices (e.g. DS3231 RTC) with one or more "master" devices (e.g. Arduino UNO). I2C connects low-speed devices like microcontrollers, and are intended for short distance communications. Each I2C device has a unique 7-bit address that must be unique on the bus used for the master device to communicate to the appropriate slave device. The master device does not need an address; it generates the clock signal (SCL). Most I2C devices communicate at 100kHz or 400kHz.
I2C is extremely powerful because it only requires two wires, and the ability to connect up to 127 slave devices. Some down falls of I2C is the relatively low-speed (versus SPI for example), and when, or if, one or more slave device shares the same unique address.
Each I2C bus consists of two signals: Serial Clock (SCL) and Serial Data (SDA). The default state of both SCL and SDA is HIGH. Communication is initiated by the master device.
Both SCL and SDA pins need to be pulled up with a resistor to HIGH.
We will not cover the explicit details of the I2C protocol. However, we encourage you to explore this further on your own!
In this module, we will construct the circuit to program and read the time for the DS3231 RTC. To program the DS3231 we will use an Arduino UNO. The Arduino UNO will communicate with the DS3231 over I2C to perform our reads (i.e. get the time) and writes (i.e. set the time).
Construct the following schematic to connect the Arduino UNO to the DS3231 RTC.
It is OK to use 3.3V or 5V to VCC.
| Arduino UNO | DS3231 RTC |
|---|---|
| 3.3V or 5V | VCC |
| SCL | SCL |
| SDA | SDA |
| GND | GND |
Hardware setup is really simple. We will not be using the SQW (square wave) and 32K (32 KHz) pins on the RTC.
Next up we will program the DS3231!
In this module, we will install a library that we will use to interact with the DS3231 in an intuitive way without needing to understand what is going on behind the scenes. We encourage you explore this library or trying to implement it on your own using the DS3231 datasheet linked in the Resources and References.
Navigate to MrSwirlyEyes' DS32321 Repository and follow the Introduction to Arduino Installing an Arduino Library tutorial module to install the DS3231 RTC library into your Arduino IDE.
Confirm you have successfully installed the DS3231 RTC Library:
With the DS3231 Arduino library installed you are ready to program the real-time clock!
In this module, we will use a special program that we created that automatically sets the time based on the compile time of the Arduino sketch. As long as the coin cell battery is inserted into the DS3231, after you program the RTC, it will keep the time as long as the battery is alive.
Regardless, over the course of months, the time will slow by a few seconds. But that is pretty good for a device that is not connected to the internet. Furthermore, unfortunately, like many clocks (again not connected to the internet) the DS3231 cannot handle Daylight Savings. It can handle leap year, but daylight savings requires a manual change (e.g. re-upload).
Finally, we will program the DS3231 so we can have a real-time clock in any hardware application that has an I2C interface.
With the appropriate circuit and the DS3231 Arduino library installed. We can now program the RTC. You can open the DS3231 set-time code from the DS3231 Arduino Library (File > Examples > DS3231 > ds3231_set_time_auto).
This code will program the DS3231 based on the compile time when uploading the code. Thus, from compile time to actual uploading to the Arduino, resetting the Arduino, and then running the program, there is some delay. This delay can vary from computer to computer and from upload to upload. You may have to adjust the SECONDS_OFFSET variable defined at the top of the code. For example, I got the best results (after a few uploads) with a SECONDS_OFFSET = 6, but this may vary for your system.
Here are the results I got after a few uploads and was happy with the approximate 1 second of delay:
If you want to keep this time, be sure the coin-cell battery is inserted into the DS3231 breakout module.
You are welcome to investigate the ds3231_set_time_manual code that is also in the GitHub and thus the DS3232 Arduino Library. It takes user input for the year, month, day of the month, day of the week, hour, minute, and seconds. However, you can get near-perfect accuracy at less than 1 second of delay.
After you are happy with your programmed time. Turn off the Arduino or remove the connection to the DS3231. If you restart the Arduino (or the Serial Monitor), it will reprogram the DS3231 at the compile time from when you uploaded it. If you want to see the time without programming it again, you will need to remove the line of code that sets the time on the DS3231 and reupload the code again.
You should have a successfully programmed DS3231 real-time clock module! You can use this device with any piece of hardware that has an I2C interface to set and get the time. This module is extremely accurate and should be off only by a few seconds over several months!